Creating a headless Ubuntu Virtual Machine on macOS
I really love my Mac, and I love macOS (though that new rename from OS X is a little odd), but sometimes, despite macOS being Certified UNIX, development is sometimes just easier with a Linux distribution than the BSD based Darwin kernel and macOS that sits above it. To solve this problem, I decided to run a headless Ubuntu Server 16.04 LTS virtual machine, one that isn’t confied to a virtual monitor that I can connect to over SSH, on top of macOS using VirtualBox.
To do this, you will need
- a Mac, preferrably running the latest macOS/OS X release (I’m using OS X 10.11 El Capitan)
- VirtualBox (I’m using 5.1.2)
- a 64 bit Ubuntu Server iso disk image (I used the minimal CD and installed the server and ssh server as options, but the standard server image should be fine)
- some command line experience
If you have all of that, and some time, then you’re ready to create your own headless Ubuntu virtual machine!
To start, open VirtualBox and create a new virtual machine, as you would with any other. Choose the right OS options and your desired amount of RAM and storage space (I opted for 1GB of RAM and 8GB of storage, but your needs may result in you needing more or less of either). Then just install your system as normal within VirtualBox. If you want shared folders, as I did, you should also install the VirtualBox guest additions after install (after inserting the guest aditions image into the virtual machine, you can run sudo mount /dev/cdrom /mnt and run the install script in /mnt as root to do so).
Now comes the fun part.
A headless virtual machine is essentially one that you control entirely over SSH, much like a server you may be hosting on a site like DigitalOcean or Linode, instead of using the window provided by your virtualization software. To do this, we want to be able to easily interface with the virtual machine over a local network. VirtualBox makes this really easy for us.
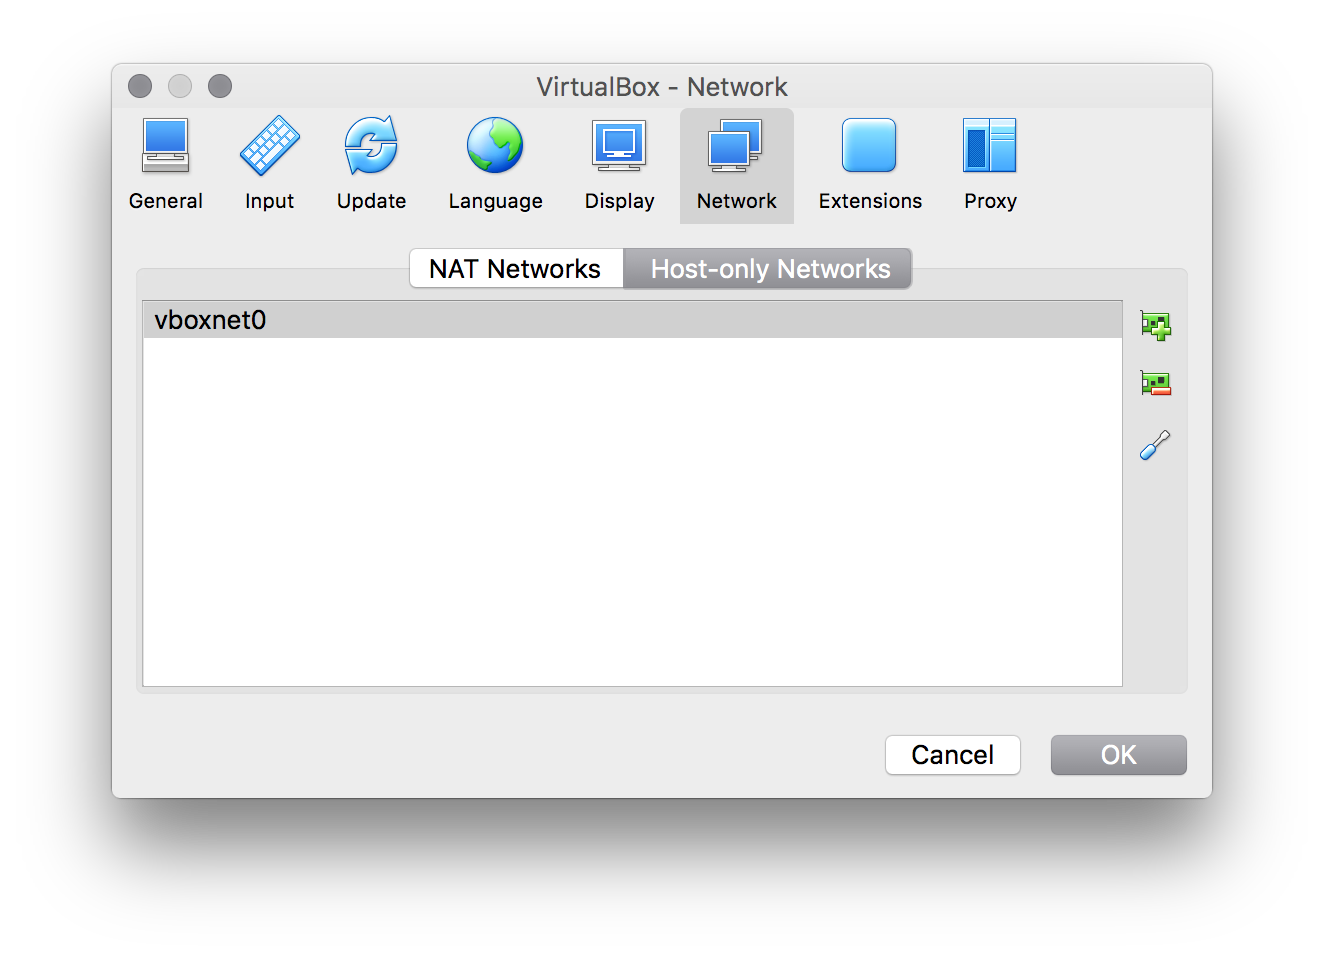
First, go into your VirtualBox preferences (not th virtual machine’s preferences) and create a new Host-Only network, if you don’t already have one (Note: I used the default settings here, so mine is named vboxnet0 and is on in the IP address range of 192.168.56.x).
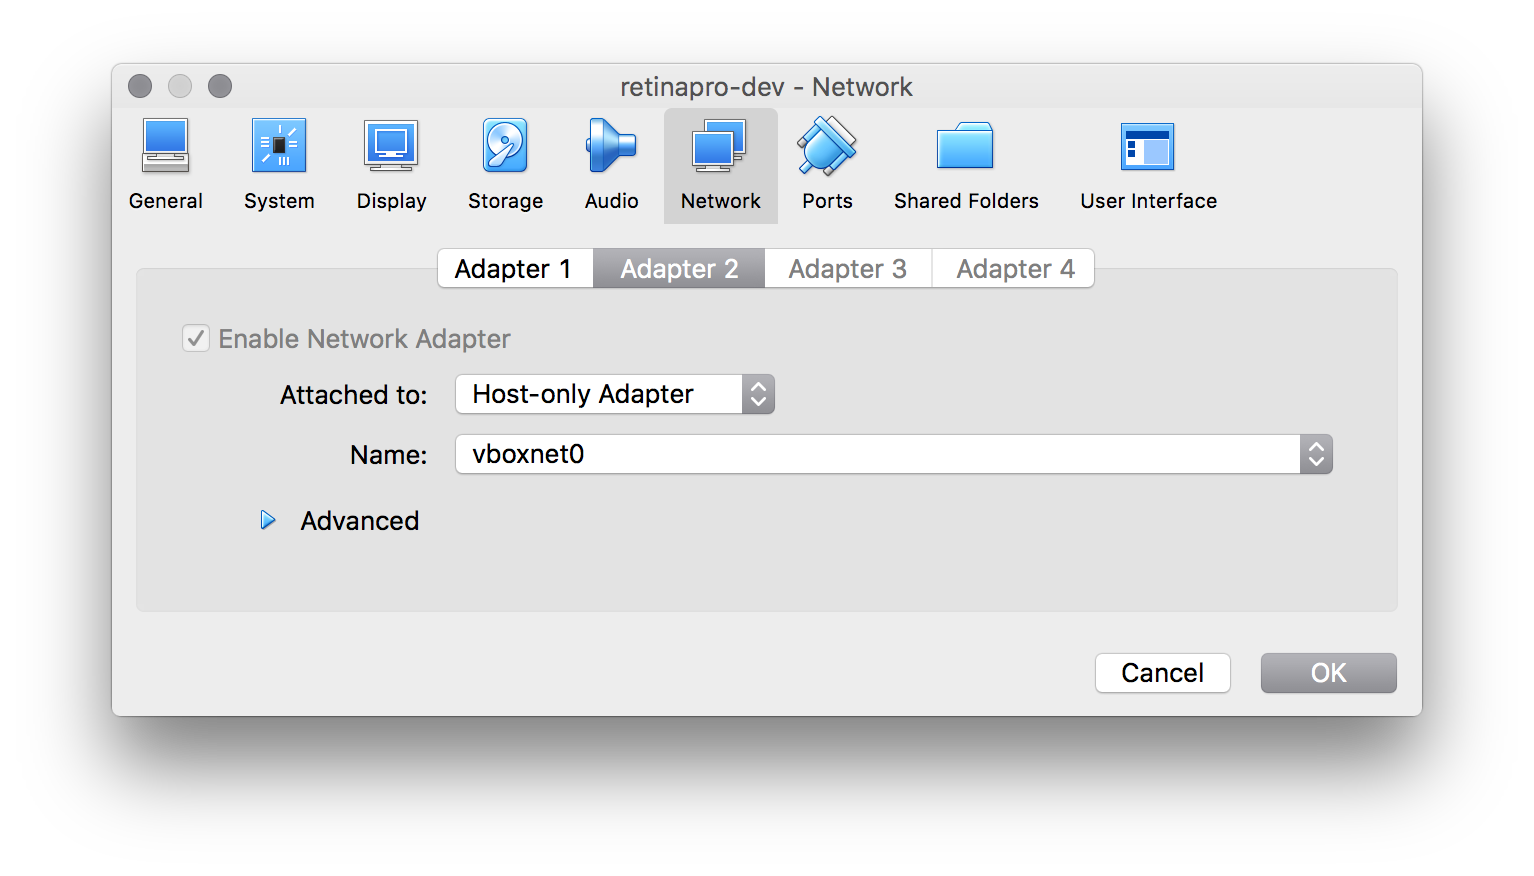
After the Host-Only network is created, you need to add a second network adapter to your Ubuntu virtual machine in its settings page, making sure to select the one you just created.
Now that the virtual machine has two network adapters, one for internet (useful for updates, package installs, or connecting to anything outside of your local computer) and the other for local connection (for SSH), we need to let the virtual machine know about it and make sure it has a static IP Address (so we can always easily SSH into the machine). To do this, we need to edit the file /etc/network/interfaces, so open that up in nano or your own favorite text editor, and add the needed info for the Host-Only network below the primary entry. Here are the settings I added, though yours could vary if you have different circumstances or a different subnet chosen in VirtualBox:
auto enp0s8
iface enp0s8 inet static
dns-nameservers 8.8.8.8 8.8.4.4
address 192.168.56.100
network 192.168.56.0
netmask 255.255.255.0
broadcast 192.168.56.255
Once that file is saved out, restart the network configuration on the virtual machine by running /etc/init.d/network restart in the command prompt, and after that, the virtual machine is ready for your use, so you can shut down the machine in VirtualBox and never have to run it with a virtual monitor ever again.
At this point, you could just start the virtual machine headless within VirtualBox and SSH into it with the bare IP address and call it a day, but I think we can do better than that.
First, you should know that you can start a headless VirtualBox machine with the VBoxHeadless --startvm "your-vm-name-here" command on your Mac, so you don’t have to keep opening VirtualBox to start the machine headless. I just ran this inside a screen session so it would always be on in the background, but you could take many approches to running this.
Next, I think that it’s really nice to have a local hostname to my computer, and by extension this virtual machine. This means that I can type ubuntu.dev and my computer will understand that to mean 192.168.56.100. This can be accomplished by editing your Mac’s hosts file, found at /etc/hosts. Here’s what mine looks like:
##
# Host Database
#
# localhost is used to configure the loopback interface
# when the system is booting.  Do not change this entry.
##
127.0.0.1	localhost
255.255.255.255	broadcasthost
::1             localhost
# My computer
127.0.0.1       zmknox.dev
# My Ubuntu VM
192.168.56.100  ubuntu.dev
Finally, I would highly recommend setting up SSH keys instead of having to type your password every time you want to connect to your virtual machine. You can learn more about how to do that from DigitalOcean here.
And now? You’re Done! You now have yourself a headless Ubuntu virtual machine that you can use for easier development on your Mac. If you have any questions, be sure to contact me.